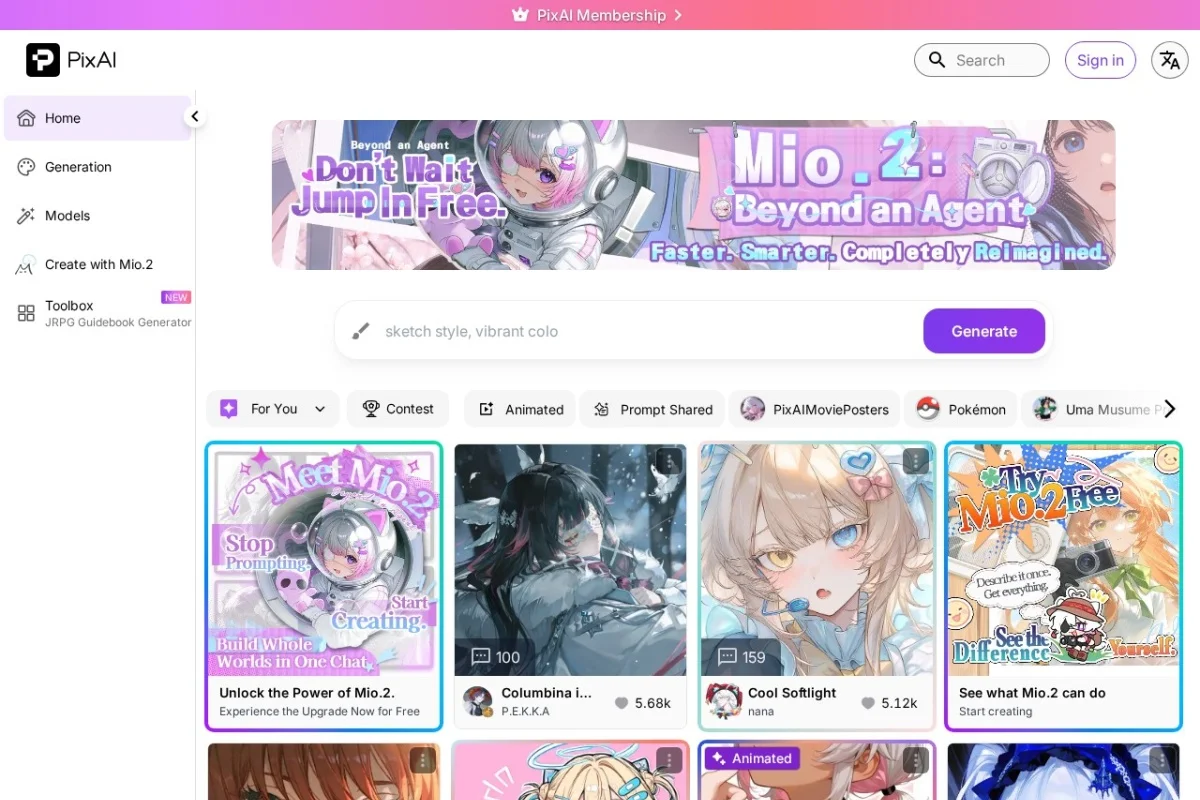
Introduction to PixAI – AI Art Generator
Welcome to the world of AI-powered creativity. PixAI is a specialized artificial intelligence art generator designed primarily for creating high-quality anime-style images. Whether you are a seasoned digital artist looking for inspiration, a writer needing character concepts, or a complete beginner who has never used an AI tool before, PixAI offers a powerful yet accessible platform. Unlike general-purpose AI art generators, PixAI is fine-tuned to understand the nuances of anime aesthetics, including distinct art styles, character proportions, and vibrant color palettes.
At its core, PixAI allows you to transform simple text descriptions into detailed, stylized artwork. You can also take an existing image and reimagine it in a new style or with different elements. The platform is built around community and sharing, featuring a vast gallery where users showcase their creations. This tutorial will guide you through every step, from your first login to mastering advanced parameters, ensuring you can generate stunning anime art with confidence.
Getting Started with PixAI
Creating Your Account
To begin using PixAI, navigate to https://pixai.art/ using your preferred web browser. The platform is web-based, meaning no software downloads are required. Click on the “Sign Up” button located in the top-right corner of the homepage. You can register using your email address, or for faster access, use your Google or Discord account. After registration, you will need to verify your email address by clicking a link sent to your inbox. This step is essential for accessing all features.
Understanding the Dashboard
Once logged in, you will see the main dashboard. This is your command center. The layout is intuitive, with a left-side navigation menu containing key sections:
- Home: Displays a feed of trending and recent artwork from the community.
- Create: This is where you will spend most of your time. It opens the generation interface.
- Gallery: Your personal collection of generated images, organized by date.
- Community: A public gallery where you can browse, like, and comment on other users’ creations. This is an excellent resource for learning prompt techniques.
- Models: Allows you to select different AI models, each with unique strengths in art style and detail.
Understanding Credits and Resources
PixAI operates on a credit system. Each generation (text-to-image or image-to-image) consumes a certain number of credits based on the image size, resolution, and the number of images generated at once. New users typically receive a free credit bundle upon registration. You can earn additional credits by being active in the community (e.g., receiving likes on your posts) or by purchasing credit packs. Always check your current credit balance at the top of the screen before starting a large project.
Key Features of PixAI
1. Text-to-Image Generation for Anime Art
This is the flagship feature. You type a description of what you want to see, and the AI generates an image based on your text. PixAI excels at understanding anime-specific terms like “tsundere expression,” “magical girl outfit,” “cel shading,” or “bishounen style.” The model has been trained on millions of anime images, so it recognizes character archetypes, poses, and backgrounds common in Japanese animation.
2. Image-to-Image Transformation
This feature allows you to use an existing image as a starting point. You can upload a rough sketch, a photo, or even another AI-generated image. Then, you provide a text prompt describing how you want to transform it. For example, you could upload a simple line drawing and ask the AI to “color it in a watercolor style” or “turn this character into a cyberpunk version.” This is incredibly useful for refining rough ideas.
3. Customizable Prompts and Parameters
PixAI gives you granular control over the output. Beyond the basic text prompt, you can adjust:
- Negative Prompt: Tell the AI what you do NOT want to see (e.g., “low quality, blurry, extra fingers”).
- Sampling Steps: Controls how many iterations the AI takes to refine the image. More steps (e.g., 50) generally yield more detail but take longer.
- Guidance Scale (CFG): How strictly the AI follows your prompt. A higher number (e.g., 12) means more adherence but can reduce creativity.
- Seed: A number that controls the random starting point. Using the same seed and prompt will produce the same image, allowing for reproducibility.
4. Community Gallery for Sharing and Inspiration
PixAI is not just a tool; it is a social platform. The Community Gallery is a curated feed of images created by other users. Each image displays the exact prompt, model, and parameters used to generate it. This means you can learn by example. If you see an image you love, you can click “Remix” to copy its settings and modify them for your own creation. This feature dramatically shortens the learning curve.
5. Character Design Tools
For users focused on creating consistent characters, PixAI offers specialized tools. You can generate multiple variations of a single character by locking in a “character seed” or using a consistent set of descriptive keywords in your prompt. This helps maintain visual identity across different poses and scenes, which is essential for comic creators or game designers.
How to Use PixAI: A Step-by-Step Guide
Step 1: Navigating to the Creation Page
Click on the “Create” button in the left sidebar. You will be presented with a clean interface. On the left side is the canvas preview area. On the right side is the control panel where you input your settings.
Step 2: Writing Your First Prompt
In the large text box labeled “Prompt,” type a description. For beginners, start with a simple structure: [Subject] + [Style] + [Details]. For example: “A young female knight with silver armor, blue eyes, determined expression, anime style, detailed background of a medieval castle, high quality.” Be specific. Instead of “a girl,” say “a teenage girl with long pink hair and cat ears.” Instead of “a landscape,” say “a sunset over a neon-lit Tokyo street, cyberpunk aesthetic.”
Step 3: Setting the Negative Prompt
Below the main prompt, there is a smaller text box for the “Negative Prompt.” This is crucial for avoiding common AI mistakes. Type things like: “bad anatomy, ugly, extra limbs, blurry, low resolution, text, watermark, deformed.” This tells the AI to actively avoid these elements.
Step 4: Adjusting Parameters
Scroll down to the parameters section. For your first few images, use these recommended settings:
- Model: Select “Anime” or “PixAI V1” (these are optimized for anime).
- Image Size: Choose a standard size like 512×768 (portrait) or 768×512 (landscape).
- Sampling Steps: Set to 30. This offers a good balance between speed and quality.
- Guidance Scale: Set to 7. This gives the AI enough freedom while still following your prompt.
- Number of Images: Set to 1 to save credits while testing.
Step 5: Generating the Image
Click the large “Generate” button at the bottom of the control panel. The AI will process your request. This usually takes between 10 to 30 seconds, depending on server load and your chosen settings. Be patient. The preview area will show a progress bar. Once complete, your image will appear on the canvas.
Step 6: Refining and Iterating
Rarely is the first image perfect. Examine your result. Is the pose correct? Is the style what you wanted? If not, adjust your prompt. Add more specific keywords, change the negative prompt, or try a different seed. The “Remix” button next to your generated image copies its settings back into the prompt boxes, allowing you to tweak them easily. This iterative process is the key to getting great results.
Step 7: Using Image-to-Image
To use the image-to-image feature, click the “Upload” icon next to the prompt box. Select an image from your computer. Then, in the prompt, describe how you want the AI to change it. For example: “Convert this sketch into a full-color anime illustration, add a magical glow effect.” You will also see a slider for “Denoising Strength.” A value of 0.7 means the AI will make significant changes. A value of 0.3 means it will stay very close to the original image. Start with 0.5.
Step 8: Saving and Sharing
Once you are happy with an image, click the “Save” icon. It will be added to your personal Gallery. To share it with the community, click the “Publish” button. You can add a title and description. Publishing not only allows others to see your work but also helps you earn credits when people like or remix your creation.
Tips for Getting the Best Results with PixAI
Master the Art of Prompt Engineering
Your prompt is the most important variable. Be descriptive but concise. Use keywords that PixAI understands well. For anime, include terms like:
- Art style: “Studio Ghibli style,” “Miyazaki style,” “cyberpunk,” “mecha,” “chibi,” “realistic anime.”
- Lighting: “Golden hour lighting,” “dramatic lighting,” “soft lighting,” “neon lights.”
- Pose and composition: “Action pose,” “looking at viewer,” “dynamic angle,” “close-up portrait.”
- Quality boosters: “masterpiece,” “best quality,” “highly detailed,” “sharp focus.”
Use Negative Prompts Aggressively
Do not be shy about the negative prompt. Common issues in AI anime art include distorted hands, extra fingers, and awkward facial expressions. A good negative prompt to start with is: “worst quality, low quality, normal quality, jpeg artifacts, signature, watermark, username, blurry, bad anatomy, bad hands, extra fingers, fewer fingers, missing fingers, ugly, deformed.” This alone will significantly improve your results.
Experiment with Different Models
PixAI offers several underlying AI models. The “Anime” model is great for standard anime. The “PixAI V1” model is excellent for more painterly or detailed styles. There are also specialty models for specific genres like “Fantasy” or “Sci-Fi.” Each model has its own strengths. Try generating the same prompt with different models to see which one aligns with your vision.
Learn from the Community Gallery
Spend 15 minutes browsing the Community Gallery daily. Look for images that have many likes. Click on them to see the exact prompt and settings used. You will notice patterns. For example, top creators often use very detailed prompts with specific artist names or style references. They also tend to use higher guidance scales (9-12) for more controlled outputs. Copying and modifying these prompts is one of the fastest ways to improve.
Control the Seed for Consistency
If you generate an image you like, note the “Seed” number displayed in the image details. If you want to create a similar image with minor changes, keep the same seed but change a few words in your prompt. This gives you a consistent base composition while allowing for variation. For character design, using a fixed seed across multiple prompts helps maintain the character’s facial features.
Optimize Your Workflow
Do not aim for perfection in one generation. Instead, use a two-step approach:
- Step 1 (Rough Generation): Use lower sampling steps (20) and a lower guidance scale (5) to quickly explore different compositions and ideas. This costs fewer credits.
- Step 2 (Refinement): Once you have a composition you like, increase the sampling steps (40-50) and guidance scale (9-11) to generate a high-quality final version. Use the same seed to lock in the composition.
Be Patient and Iterate
AI art generation is a creative collaboration between you and the machine. Do not get discouraged if your first few images are not perfect. Each generation teaches you something about how the AI interprets language. Keep a notepad (physical or digital) of prompts that worked well and those that did not. Over time, you will develop an intuition for what words produce specific effects.
PixAI is a powerful gateway into the world of AI-assisted anime art. By understanding its features, practicing your prompt writing, and engaging with the community, you will quickly move from a beginner to a creator capable of producing unique, high-quality artwork. Start simple, experiment often, and enjoy the process of bringing your imagination to life.

PixAI - AI Art Generator
Create stunning anime AI art with advanced generation tools.